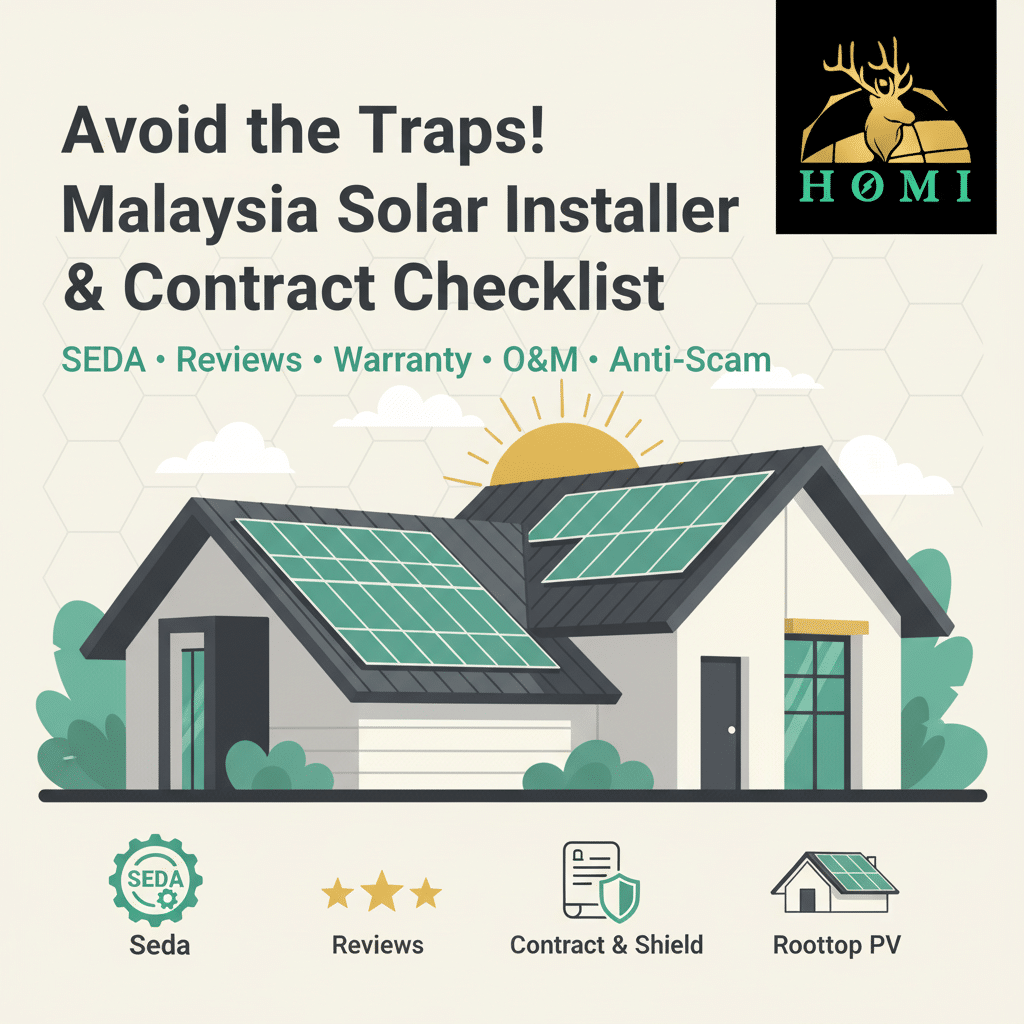
So, you’ve confirmed your roof is suitable for solar and have estimated the system size you need. Now comes the most crucial step: selecting a professional and reliable installer. With numerous options and varying prices in the market, how do you ensure you don’t make a costly mistake?
Keep this checklist, designed specifically for Malaysian homeowners, handy to protect your investment every step of the way.
Step 1: Installer Due Diligence (Before Signing)
Before you even contact a company, do your homework.
-
[✅] Verify SEDA Certification:
-
Why it matters: SEDA (Sustainable Energy Development Authority) is the official governing body. Only SEDA-registered Renewable Energy Service Providers are qualified to apply for the Net Energy Metering (NEM) program and handle the grid connection process with TNB on your behalf. This is the absolute minimum requirement.
-
How to check: Visit the official SEDA website and search their directory of registered service providers.
-
-
[✅] Check Reviews and Past Projects:
-
Where to look: Don’t just rely on curated testimonials on the company’s website. Go to third-party platforms like Google Reviews and Facebook pages to see authentic customer feedback, especially regarding after-sales service.
-
What to look for: Pay attention to comments on installation quality, communication, and responsiveness to issues. If possible, ask the installer for references to completed local projects.
-
-
[✅] Get at Least Three Quotations:
-
Purpose: To compare offers and understand the market rate. This isn’t just about price; it’s about comparing the details of the proposal, including equipment brands, warranty terms, and the scope of services included.
-
Step 2: Scrutinize the Contract (When Signing)
Once you receive a quotation and contract, review it with a magnifying glass. Ensure the following key clauses are crystal clear:
-
[📜] Equipment Brands and Models:
-
The contract must explicitly list the specific brands and model numbers for the solar panels, inverter, and mounting system. This prevents a “bait-and-switch” to cheaper or inferior products during installation.
-
-
[📜] The Triple-Layer Warranty:
-
Product Warranty: Typically 12-15 years for panels and 5-10 years for inverters. Ensure this is the official manufacturer’s warranty.
-
Performance Warranty: The industry standard is a 25-year linear power output guarantee (e.g., ensuring at least 80% of original output in year 25).
-
Workmanship Warranty: This is the installer’s own guarantee and it’s critically important. It covers any issues arising from the installation itself, such as roof leaks or loose racking. It should be for a minimum of 2-5 years.
-
-
[📜] Scope of Work and Timeline:
-
The contract should detail all services included in the total price: equipment procurement, shipping, installation, application submissions to SEDA and TNB, testing, and commissioning.
-
It should also provide an estimated start and completion date.
-
-
[📜] Payment Schedule:
-
Be wary of companies demanding a large upfront deposit (e.g., more than 30%). A healthy payment structure is typically: a small deposit upon signing -> a payment upon equipment delivery -> a payment upon installation completion -> the final payment after successful grid connection.
-
Step 3: Watch Out for Red Flags and Scams
-
⚠️ Unbelievably Low Prices: A price far below the market average often means substandard components or cutting corners on installation quality.
-
⚠️ Verbal Promises: Any promise made by a salesperson, such as “free lifetime maintenance” or “guaranteed energy production,” is only valid if it’s written into the contract.
-
⚠️ High-Pressure Sales Tactics: Phrases like “this special offer ends today” or “the price is going up tomorrow” are tactics to rush you into signing without due consideration.
Conclusion:
Choosing a solar installer is like choosing a partner for the next 25 years. Taking the time to conduct thorough research and meticulously review your contract is the best way to secure your investment and ensure long-term, hassle-free returns.